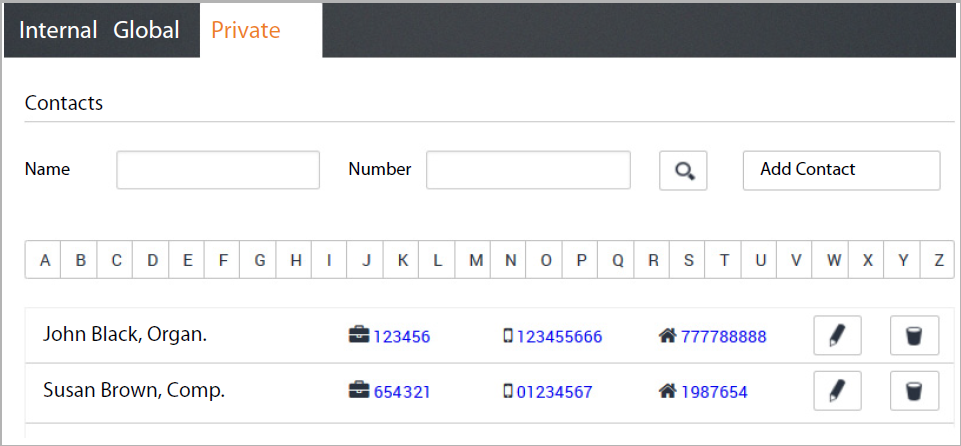
IntroductionThe PBX provides the following phone books: - Internal: contains all extensions that are registered on the PBX and their users
- Global: contains a company phone book provided via the PBX
- Private: contains contacts that you can enter and maintain yourself
The phone books are available on the Gigaset phones as follows: Internal: Within the Contacts menu as Central phone book -> Internal Global: Within the Contacts menu as Central phone book -> Imported Private: Within the Contacts menu as Central phone book -> Personal Finding a contact and dialing their numberIn the Contacts screen you have access to all phone books.  - Menu
- Contacts
- Select the phone book (Internal | Global | Private)
To search for a contact- In the Name field enter the first letter(s) of the first or last name and/or in the Number field enter the first digit(s) of the phone number
- Click on Search
or All entries that match the search option are displayed.
Example:
Entry in Name field: Su
Entry in Number field: 089 All entries whose first or last name begins with “Su” and whose phone number begins with “089“ are displayed. ContactsAn entry contains the following information (if available): - First name Name, Company
- Work phone number
- Mobile phone number
- Home phone number
Dialling from the phone book - Click the desired number . . .
- Pick up the handset . . . The call is connected.
Adding a new contact / Editing a contactIn the Private phone book you can add, edit or delete contacts. When you save personal contacts they are also saved to the phone book on the telephone. To enter a new contact:  To edit a contact: - Click on
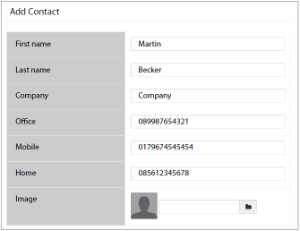
 next to the entry you want to edit. next to the entry you want to edit. - Enter the contact details. You must enter at least one name (First name or Last name) and the work phone number (Office).
- Add a picture: The picture will be displayed in the call list when you receive a call from this contact.
Formats: PNG, GIF, TIFF, JPG - Click on Select a picture from the file system of your computer or network . . . The file name is shown in the text field
- Save . . . The entry is added to your personal contacts and saved to the phone.
Entries in the Private phone book are only associated with the user name under which you are working, and thus only with the corresponding extension. If you also want to use the phone book on a different extension registered in your name, you need to export it here and import it under the other user name. |
Exporting / Importing contactsYou can import contacts from other phone books into your personal phone book or you can export your personal phone book. The data is moved via CSV files (Comma-Separated Values). To export contacts- Menu
 - User Settings
- Contacts import/export
- CSV export
- Select the Encoding type (UTF8 or ISO) and Separator (comma or semicolon) for the export file.
- Enable Header if the first line of the file is to contain a header.
Enabled: The first line of the export contains
First name,Last name,Company,Number,Mobile,Home
Disabled: Only the contacts are exported. - Start the export:
- Click on Download CSV
- Select the storage location for the file in the file system and, if applicable, enter a file name. Default: pr_pb_<user_name>.csv
The storage location for the file and file name can only be selected or entered if this is allowed by the settings in the browser for downloading files. |
To import contactsAn import file with the contacts must be stored locally on your computer or in the network. File format: First name,Last name,Company,Number,Mobile,Home
Separator: Comma, semicolon or tab Example with semicolon and header:
First name;Last name;Company;Number;Mobile;Home
Peter;Brown;Company;123456789;01784567;083416786
Susan;Black;Org;987654321;015679787878 - Menu
- User Settings
- Contacts import/export
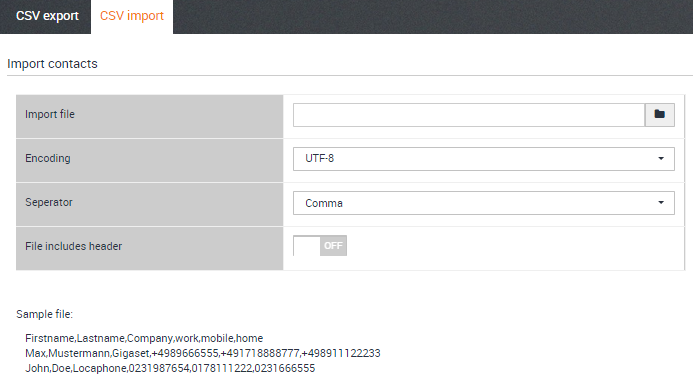
- CSV import
- Click on ...
- Select the file from the file system of your computer or network
- Select the encoding type (UTF8 or ISO) Select the separator to be used
- File includes header
Enabled: The first line of the file is not entered as a contact
Disabled: The first line is entered as a contact - Click on Upload . . . The entries are displayed as a table for you to check
- Click on Import . . . The entries are imported into your personal phone book. This takes place even if a contact with identical data is already contained within the phone book.
Quick dialNew in software 1.0.6 The quick dial option provides the possibility to dial a Contact phone number using a feature code (*1) and the quick dial number | Quick dial |
|---|
| * 1 | Quick dial number | Quick dial the Contact phone number. |

If the User option: "Update number (CLIP)" is enabled, the Quick dial code will be replaced by the Phonebook Contact name when the ringing of the Callers device is received. 
|
| 


